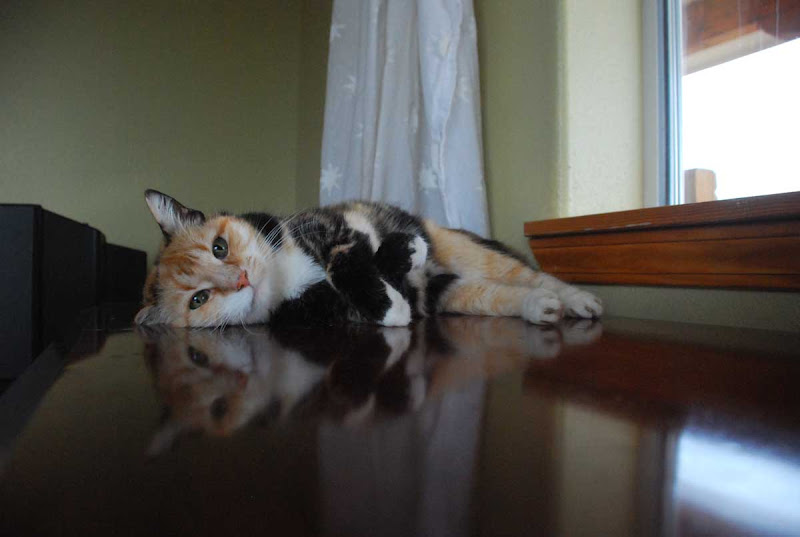
Let's start with this picture of Rosebud. Here it is, straight out of the camera:

When I walked into my bedroom and saw Rosebud asleep atop the dresser, with her paws crossed and her image reflected in the wood, I thought, "awww..so sweet...now where in the heck is my camera and will she still be there by the time I find it?"
I found the camera, and she was (she's a very lazy cat). But when I looked through the lens, I saw stuff that I wished wasn't there...the ugly tv over on the left, the blown-out sky over on the right. I could move the tv and close the window shade, but then I'd risk Rosebud moving and losing the moment altogether. So I fired off some shots, knowing that I could crop them later.
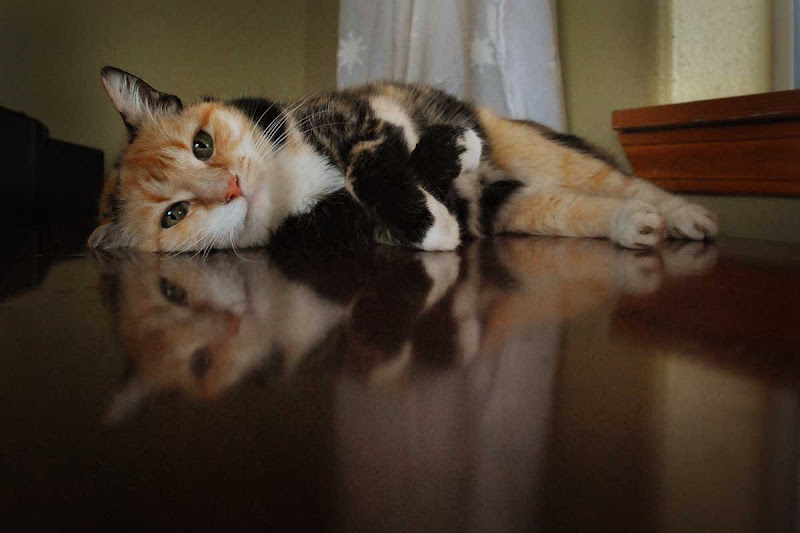
Here's the edited version:

Here's what I did:
1. Cropped image to lose the sky and most of the window.
2. Ran PW's Warmer action at 100%.
3. Ran MCP's High Definition Sharpening action at 50%.
4. Ran MCP's Touch of Lightness/Touch of Darkness action to slightly brighten Rosebud's reflection in the wood.
5. Ran Coffeeshop's Vignette action to darken the edges, drawing the eye to Rosebud and her reflection.
I learned a new HTML trick last week and have been dying to try it. Here goes... Place your mouse over the image below, then roll your mouse off the image into the margin somewhere, then back onto the image. The before and after photos should alternate each time you move the mouse.
 |
If that worked, you can thank Shadowhouse Creations, who posted this tutorial. If it didn't, you can blame me for screwing it up.
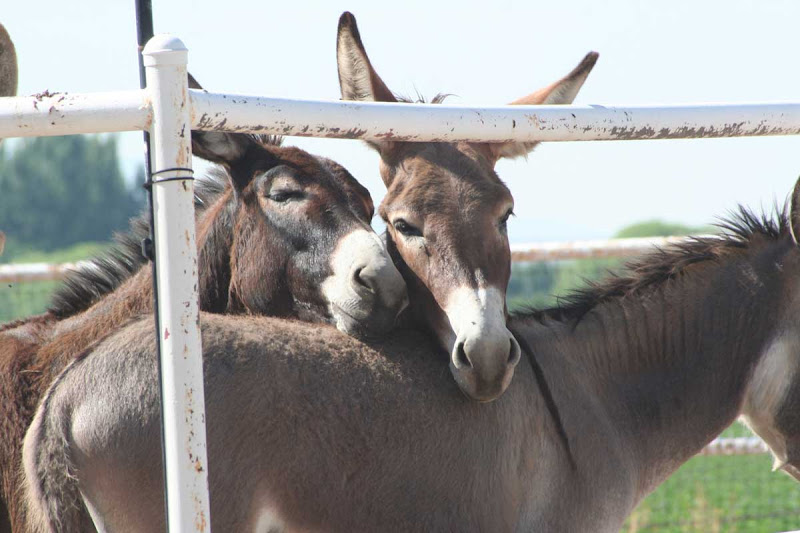
Justina sent me this next photo, of Nigel and Fergus. She captured them in all their wonderfulness resting their heads on Bernard, but the New Mexico sun was high in the sky and the harshness of the light all but ruined this tender moment:

Could Photoshop save the day?

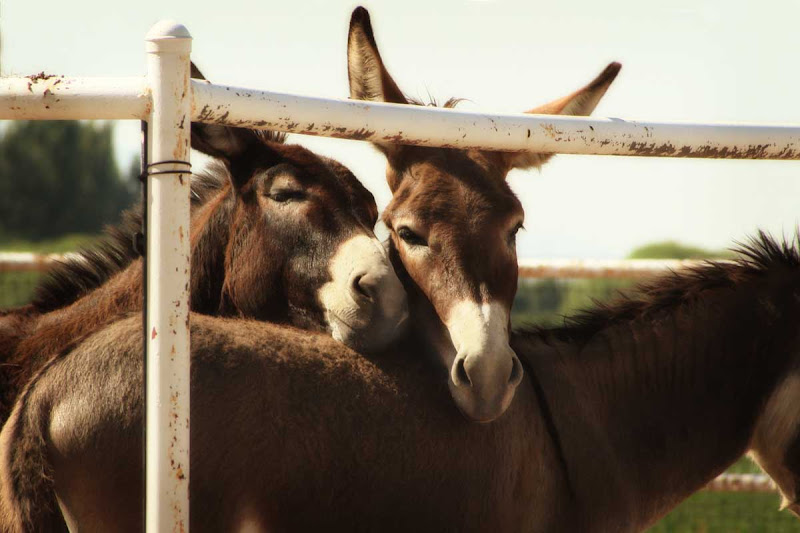
Here's what I did:
1. Straightened the fence post using the Ruler tool and "arbitrary rotate," (my number one favorite photoshop trick of all time).
2. Using the Clone tool, removed whatever those distractions were in the top left corner.
3. Ran PW's Old West action to tone down the harshness of the light.
4. Ran MCP's Touch of Lightness/Touch of Darkness action to bring Fergus' and Nigel's muzzles out of the shadows.
5. Shooed those flies off of Fergus' nose and eye with the Spot Healing brush.
Let's try that before and after trick again...roll your mouse back and forth from the image to the margin.
 |
There are days when I just love technology. You'd think they'd invent something to remind me when it was Tuesday.

What 'magic' you can work with pictures! I also love rolling the mouse around and seeing the before/after.
ReplyDeleteWhat impressed me most, actually, is the spotless, shiny top on which Rosebud is lying. Wow! In my house, with 4 cats, a boy and constantly opened windows,there's a "permanent" (permanent meaning as soon as I wipe it off a new one settles) layer of dust and cat hair on the furniture. Sigh... Guess you're a much better housekeeper than I am...
ReplyDeleteWow! Totally magical. I love how that works. The photos you chose were great.
ReplyDeleteSensational!
ReplyDeleteLove what you did, 7MSN. Amazing!
ReplyDeleteif that had been my dresser i would have had to dust it first! rosebud is so purrty =o)
ReplyDeleteLove it explained. And the mouse trick. Your cat picture is awesome. The reflection makes it. Mine would have shown dust bunnies dancing on the wood.
ReplyDeleteGreat shots, Carson. I never know what day of the week it is either. How 'bout "If it's Tuesday it must be Photoshop Day"
ReplyDeleteBest always, Sandra
And all this time I thought you didn't have flies in New Mexico! :)
ReplyDeleteThe mouse trick worked perfectly. Too fun!
These tools are incredible. Someday I'm going to take a day and learn how to use them. I use photoshop, but just the tools built in.
That is soooo cool!!!
ReplyDeleteNancy in Iowa
That mouse roll trick is just perfect for this project. I know I'm not as much of a perfectionist as you are about photos, and it really helps me see the improvements. Thank you, Linda, for this and all the other photography help (and inspiration) you've given me.
ReplyDeleteGreat lesson. Now, finding the time to sit down and learn it! I have a pic of my new grandson's foot in my hand that I'm gonna have to send your way.... maybe you could erase the wrinkles....
ReplyDeleteI love the mouse trick. How cool is that?
ReplyDeleteI saw the tutorial on Shadowhouse Creastions but that's as far as it went. I love his grunge backgrounds and one day will (maybe when the grands go back to school) get to all the fun things I'd like to try on Photoshop. Like maybe sending you my photo.....yep we'll both be totally on the other side of whenever by then. Love your donkey friends anyway.
ReplyDeleteLove the Rosebud photo!
ReplyDeleteFantastic the HTML trick. Thanks for teach and for the link to Shadowhouse Creations.
Very nice post full of wonderful images. Glad to see the mouseover in action, looks great.
ReplyDeleteThis new trick? Pure magic!
ReplyDeleteDon't tell the others, but I think Rosebud may very well be my favourite house kitty. I love how she has her little paws crossed.
ReplyDeleteLOL I agree with all of you who commented about the dust-free dresser. Not in my house!
ReplyDeleteSo, Carson is not only a great photographer and photo fixer...but she keeps a spotless house too! Impressive! So, an alternative to Touch-Up Tuesday, if you run out of photos to touch - up, could be housekeeping (ranch keeping) 'Trim & Tidy Tuesday' - Arrghhhh, please, no!
Wow, I love that first image, and the little photoshopping you did, made it just that much more interesting. And Rosebud is a sweetie. Love love love Photoshop. However, I’m still using PSE4, yes, that’s right version 4. I soo want to upgrade. But, that means upgrading the computer too. And that’s not going to happen anytime soon. I would love to be able to use actions. *sigh* Thanks for stopping by my blog, I’m so glad to have found yours! I’ll be back for Touch-it-up Tuesday.
ReplyDeleteFor the burros, I really prefer the actual photograph. You lose the color and shading of the animal upon which they rest their heads. What you have added is the sepia tone.
ReplyDeleteBest wishes.
Love the old west fix on the donkeys! Great job and love the mouse switch! Boo...now I wish I had a PS tool to help my donk with his abscessed hoof. Poor boy.
ReplyDeleteYou're so good at this! Maybe it's time to start getting paid to fix people's photos! :D
ReplyDeleteCalicos are my secret fave pussycats and Rose bud (perfect name!) is a heartbreaker!
ReplyDeleteThank you for the before and after shots...now it's time to drag it all into my cave....
I'm studying these photos and what you did Linda. I've downloaded and installed a few actions but to get PW's actions I'd need to have at least CS4, which I don't have. Oh well.
ReplyDeleteExcellent tutorials! And photos!
you rock as always.....love the new html feature.......makes comparing the before and after easier(and I need all the help I can get in general!)
ReplyDeleteLike that before and after trick.... Where did you learn it?
ReplyDeleteThat's wonderful to be able to see the before and after shots! Thanks for sharing.
ReplyDelete